Perform a migration
In this article, you will learn how to create and run SQL queries in the Aident SQL Migration app in Business Central.
Prerequisites
- The SQL Migration Setup must be set up.
- A Database Assignment with the corresponding table and field assignments must be set up without errors.
- The permission set must be assigned to your user.
How to create SQL queries?
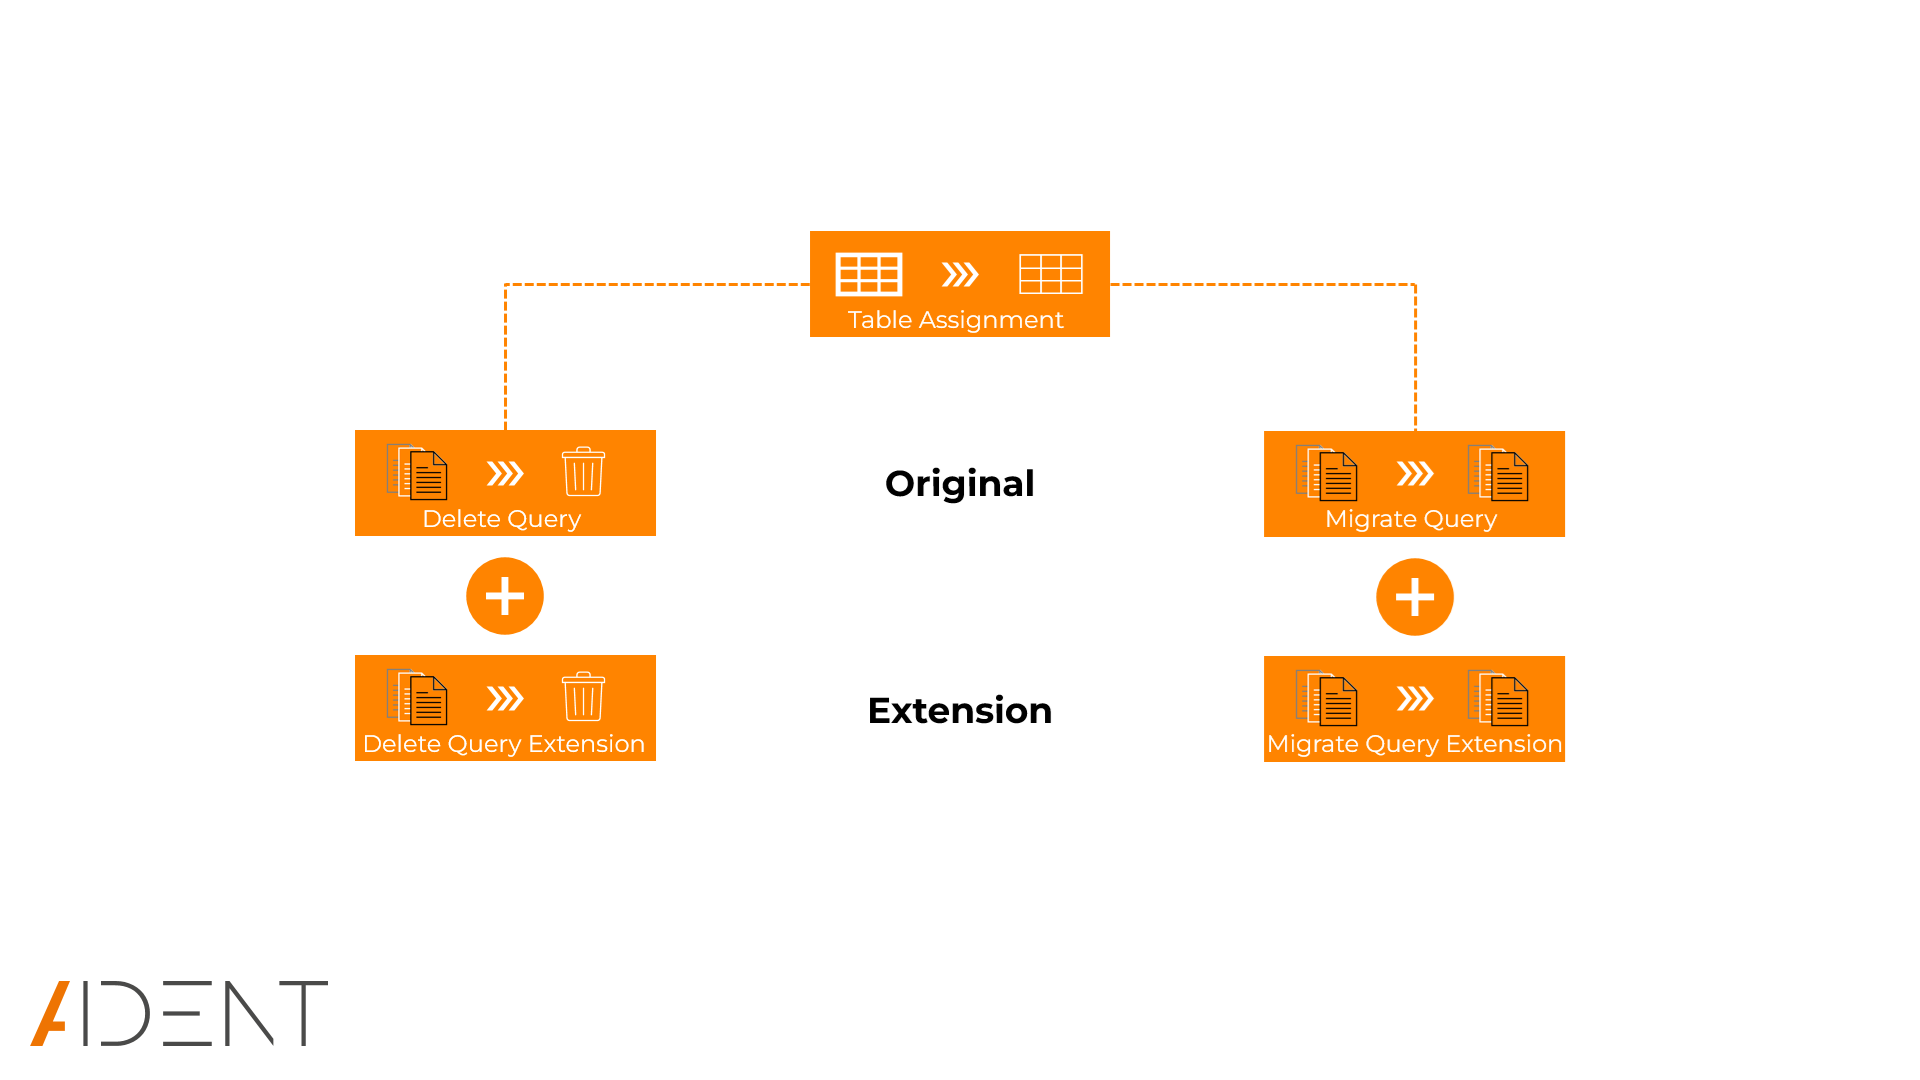
For table assignments that do not have errors, SQL queries can be created and executed individually. The default companies from the respective database are used. There are three different modes for generating and executing SQL queries:
- Create Query: Only the SQL queries for deleting the data in the destination table and migrating the data from source table to destination table are generated.
- Delete Destination Data: The SQL queries are generated and the query to delete the records in the destination table is executed.
- Transfer Data: The SQL queries for deleting the data in the destination table and migrating the data from source table to destination table are created and executed.
For each table assignment, an SQL query is generated to delete the data in the destination table and an SQL query to migrate the data from the source table to the destination table. If the destination table contains one or more extensions, additional SQL queries are generated for the table assignment to delete and migrate the data.
Important
Please note that the execution of SQL queries on the database server can't be interrupted from Business Central. Clicking the Cancel button during the execution of an SQL query only interrupts the process in Business Central but not the execution of the SQL query on the database server. The execution of the SQL queries must then be canceled on the database server itself.
Create an SQL query for single table assignment
Follow these steps to create SQL queries for a single table assignment:
- Navigate to Database Assignments
- In Business Central, search for and go to the
Database Assignmentspage.
- In Business Central, search for and go to the
- Open Database Assignment
- Open the database assignment for which the SQL queries should be created. The Database Assignment Card page opens.
- Open Table Assignment
- Open the table assignment in the Table Assignments SubPage for which an SQL query is to be created. The Table Assignment Card page opens.
- Create and run Query
- Click Create Query, Delete Destination Data or Transfer Data in the Home action menu to generate (and execute) the SQL query.
- Check SQL Query
- Click Created Queries in the Home action menu to open the Queries page and check the generated SQL queries.
Create and run an SQL query for multiple table assignments
Follow these steps to create and run SQL queries for multiple table assignments:
- Navigate to Database Assignments
- In Business Central, search for and go to the
Database Assignmentspage.
- In Business Central, search for and go to the
- Open Database Assignment
- Open the database assignment for which the SQL queries should be created. The Database Assignment Card page opens.
- Create Queries
- Click Create Query, Delete Destination Data or Transfer Data in the Queries action menu.
- Set Filter
- Set a filter for e.g. Destination Table ID to determine for which table assignments the SQL queries should be generated. If no filters are set, all table assignments are run through.
- Run Query Creation
- Click OK to generate (and execute) the SQL queries for the selected table assignments.
- Check SQL Query
- Click Created Queries in the Queries action menu to open the Queries page and check the generated SQL queries.
Create and run an SQL query for multiple company assignments
Follow these steps to create and run SQL queries for multiple company assignments:
- Navigate to Database Assignments
- In Business Central, search for and go to the
Database Assignmentspage.
- In Business Central, search for and go to the
- Open Database Assignment
- Open the database assignment for which the SQL queries should be created. The Database Assignment Card page opens.
- Open Company Assignment
- Click Company Assignments. The Company Assignments page opens.
- Create Queries
- Click Create Query, Delete Destination Data or Transfer Data in the Queries action menu to generate (and execute) the SQL queries.
- Set Filter
- Set a filter for e.g. Destination Table ID to determine for which table assignments the SQL queries should be generated. If no filters are set, all table assignments are run through.
- Run Query Creation
- Click OK to generate (and execute) the SQL queries for the selected table assignments.
- Check SQL Query
- Click Created Queries in the Queries action menu to open the Queries page and check the generated SQL queries.
Check generated SQL queries
Follow these steps to check the generated SQL queries:
- Navigate to Database Assignments
- In Business Central, search for and go to the
Database Assignmentspage.
- In Business Central, search for and go to the
- Open Database Assignment
- Open the database assignment for which the SQL queries are created. The Database Assignment Card page opens.
- Open Created Queries
- Click Created Queries in the Queries action menu. The Queries page opens.
- View Delete Query
- Select a record and click View Delete Query in the action bar. The Query Editor page opens and views the generated deletion query for the selected record.
- View Migration Query
- Select a record and click View Migration Query in the action bar. The Query Editor page opens and views the generated migration query for the selected record.
Count records
Follow these steps to count records in the source and destination tables:
- Navigate to Database Assignments
- In Business Central, search for and go to the
Database Assignmentspage.
- In Business Central, search for and go to the
- Open Database Assignment
- Open the database assignment for which the SQL queries are created. The Database Assignment Card page opens.
- Open Created Queries
- Click Created Queries in the Queries action menu. The Queries page opens.
- Update No. of Records
- Click Update No. of Records in the action bar. An SQL query is generated which counts the records for both source and destination table. The number of records is displayed in the Source No. of Records and Destination No. of Records fields. Discrepancies are displayed in the Equal No. of Records field.